Recipe: Sprinkle Cake

Hey Cats!

This past weekend, I had a family reunion with my dad’s side of the family. We have it every year, and I always love going! It’s great to see my family, plus there’s always really delicious food. I was talking to my dad a couple of days before and he asked me what I was going to bring. “Wait, what?” I’m still used to being a child and not having to bring food, but I guess since I’ve been a responsible adult for a full year, I’m capable of bringing some sort of dish to a function. So, I decided to make one of my favorite recipes that’s beyond easy but also delightful. And I made two, because I wanted to keep one for myself.

FullSizeRender (15)

Sprinkle Cake!! Y’all. This cake is probably my favorite. It’s simply a pound cake with sprinkles inside! Confession: I only make this to take somewhere when I know I will have plenty to bring home. Not a joke. I like to eat it for breakfast. It’s just SO GOOD. Also, people love it, because it’s fun! You know how people have “signature dishes” that they’re asked to bring to functions? I want this to be mine. “Kristen, bring that sprinkle cake, it’s so good!”. That is my dream.I clearly have too much time on my hands. So anyways, here’s how you make this:

I got this recipe from The Sweet {Tooth} Life, so I can’t really take credit, but I would love to share!

Here’s what you’ll need:

-1 cup (2 sticks) butter, softened

-1 cup of sugar

-4 eggs

-1 tsp vanilla extract

-1/2 tsp salt

-2 cups of flour

-1/2 cup rainbow sprinkles (I used Jimmies… I honestly hate that they’re called that so much but I couldn’t think of another way to explain them. Ugh Jimmies. Such a stupid name.)

Here’s what you’ll do:

1.First, cream together the butter and sugar in a large bowl.

2. Add eggs one at a time, beating thoroughly after each.

3. Mix in vanilla and salt until fully incorporated.

4. Add flour and stir until smooth!

5. Add the sprinkles and give it another stir

6. Transfer to a buttered & floured loaf pan

7. Bake at 350 degrees for one hour

8. Enjoy!

This is a great quick dessert to bring to an event, or for whenever you feel like something sweetie. Give it a try and let me know what you think!

That’s all for meow!

For more Sweet Cats!, follow along at:

Bloglovin’
Twitter
Facebook
Pinterest
Instagram

Cooking For One

Hey Cats!

Happy Wednesday! It came quickly this week, since we had Monday off. I loved having an extra day to sleep in and lay by the pool, but it’s kind of gotten me thrown off a bit! I kept thinking Monday was Sunday and Tuesday was Monday, and I’m always wishing it was Friday. I digress.

I love to cook. I remember being so excited to escape the greasy campus food when I moved out of the dorm and into a house with a kitchen in college. I was going to cook every day and love life! But that proved to be a challenge. I was used to helping my mom cook dinner for our family of four, so when I started making dinner for just myself, I wasn’t sure where to begin! Over the past few years, I’ve perfected the art of cooking for one, and it’s actually not as difficult as you’d think! Here are some of my favorite tips for those of you just moving into your first kitchen!

FullSizeRender (14)

1. The freezer is your friend! 

Every two weeks or so, I buy a package of chicken tenders from the meat section of the grocery store, take it home and wrap each one individually in foil and pop it in the freezer. In the past, I bought the huge bag of IQF frozen chicken breasts, but then they started to get really gross (think blood and bones-ick.). This may be slightly more expensive and doesn’t last as long, but they’re definitely better quality! Plus, it’s super easy to just move one from the freezer to the fridge in the morning to thaw for dinner that night!

In addition to chicken, I will occasionally buy a big piece of salmon and cut it into thirds or quarters, depending on the size, and freeze that as well. However, I would recommend eating the salmon within the week!

I also like to keep a bag of frozen corn and a bag of frozen peas on hand in my freezer. If I don’t feel like cooking a vegetable I’ll just heat up a small bowl of one of those, or if I’m making stir fry I’ll just toss in a handful! These last forever and they’re super cheap!

2. Try to repurpose your leftovers in creative ways. 

I’m usually okay with leftovers, but when you live alone, leftovers can last a while longer than you want them to. I don’t know about you, but eating something every day for dinner (and sometimes lunch also) makes me never want to eat it again. Typically, I try to avoid leftovers, but sometimes it can’t be helped! Let’s say you made a pound of hamburger meat for stuffed bell peppers one night, and you still have a lot left. Well, you could make tacos the next day, or you could make a small pot of chili!

3. Buy perishables in small quantities.

Sometimes it’s super tempting to buy both asparagus AND Brussels sprouts, but don’t. You will regret it and it will be a waste of money, because one will definitely go bad before you can eat it. You might think that you’ll get tired of the same vegetable every night, but if you prepare it a little differently, that will shake things up a bit! I like to roast Brussels sprouts, but sometimes I sprinkle them with red pepper, or toss them in sriracha, or sprinkle them with goat cheese!

4. If you want something big, invite friends over! 

I love lasagna and enchiladas, but if I made them for just myself, I could never eat it all! If I’m dying to have something different, I will whip it up and invite a few friends over to help me eat it. And depending on how many people you have/what you make, you may still have some leftover for lunch!

5. Don’t be afraid to experiment

I will often find recipes on Pinterest that look delicious, but they typically feed a small country. If I want to try it, I’ll peruse the ingredients and come up with a smaller version for myself! Or, I will add the ingredients on top of a pizza or mix them into pasta for something easy and different. Just make sure you scale everything down evenly, or else the flavors will be off and it will not be delicious.

Cooking for one can seem boring, but it doesn’t have to be! Hopefully you learned something new today. If you have any tips or yummy recipes for just one person, let me know! Also, be sure to check out all of my recipes– most of them have a serving size of one person!

That’s all for meow!

For more Sweet Cats!, follow along at:
Bloglovin’
Twitter
Facebook
Pinterest
Instagram


Recipe: Shrimp & Spinach Summer Salad

Hey Cats!

Happy Wednesday-we’ve made it halfway! I hope everyone is having a great week so far. For me, it’s been busy but happy. Monday night I went to a new Bible study with my friends, and last night was my last Junior League meeting of the year. Tonight I’m at home, and will probably be scrambling to get my life together before I head to the beach on Sunday with my friends! SO EXCITED.

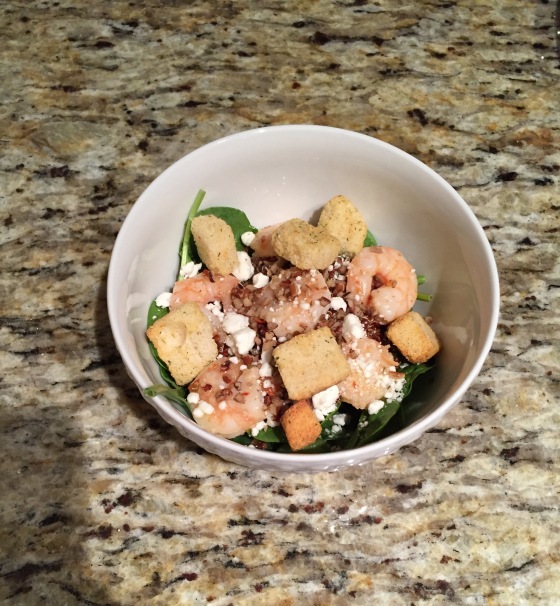
I threw this salad together Sunday night, and it was so yummy that I had it again for lunch on Monday! This weekend, I bought shrimp for dinner for a little something different. However, I asked for 1/4 of a pound, but walked out with 3/4 of a pound, and it was like $9 so I’ve had to get creative to use it all. This is just one way! This meal is perfect for lunch or a summer dinner!

FullSizeRender (8)

Here’s what you’ll need:

-Spinach

-Shrimp

-Quinoa

-Goat Cheese

-Croutons (optional but delicious)

-Lemon vinaigrette (or whatever dressing you desire)

Since I’m going to assume you all know how to combine ingredients in a bowl to make a salad, I don’t need to include steps. But I will tell you how I cooked my shrimp!

  1. Melt 1-2 tablespoons of butter
  2. Spread raw shrimp out on a cookie sheet. I got mine from the counter, and went with peeled and de-veined.
  3. Pour the butter over the shrimp, and sprinkle with salt, pepper, garlic powder, and crushed red pepper flakes.
  4. Toss until evenly coated
  5. Cook at 350 degrees for 7-10 minutes until pink and curly!

So easy, and so quick! Also, the dressing I used was divine. I found it at the grocery store and thought it would be the perfect light addition to my shrimp salad. It’s called Leo’s Lemon & Caper dressing, and is pictured below. I also like Marzetti’s Lemon dressing, or you could make your own! I liked how the taste didn’t overpower everything else in my salad.

FullSizeRender (10)

That’s all for meow!

For more Sweet Cats!, follow along at:

Bloglovin’
Twitter
Facebook
Pinterest
Instagram

Recipe-Spicy Shredded Chicken Sweet Potato

Hey Cats!

It’s only Wednesday? This week has been dragging on it seems! I’m going home this weekend, so that could be why. But it has been/is going to be a fun week! Monday night my friends and I made s’mores on the grill at my apartment complex, which was definitely an adventure. Then tonight, I have my end of provisional year party with the Junior League, and it’s Kentucky Derby themed! Stay tuned for pictures of my outfit, because I’m so excited about it.

On to the main event. Sweet potatoes are my new favorite thing, and I’ve been experimenting with different ways to make them for dinner. I’d seen a few recipes on Pinterest that had shredded chicken inside a baked sweet potato, so I decided to make my own version! It’s so easy and requires very little cleanup, which is always a plus!

IMG_1743

Here’s what you’ll need:

-1 sweet potato

-1 chicken breast, cooked and shredded

-2 tablespoons sriracha

-1/4 cup lemon juice

-2 tablespoons honey

-cilantro

-salt and pepper

-goat cheese crumbles

Here’s what you do:

1.First, bake your sweet potato and cook your chicken. I baked mine at 400 for 45 minutes, and boiled my chicken breast for about 20 minutes.

2. Once the chicken is cool, shred it.

3. In a bowl, mix together the sriracha, lemon juice, and honey. Adjust amounts to taste!

4. Chop the cilantro finely and stir it into the sauce, along with a sprinkle of salt & pepper.

5. Toss the shredded chicken in the sauce. You can let it marinade for a while if you’d like!

6. Top your tuber with the spicy chicken and goat cheese crumbles.

7. Enjoy!

See, it’s so easy! And if you’d like, you can bake a few potatoes and make more chicken to have it again for lunch or a quick dinner later in the week. I love the spicy chicken with the creamy sweet potato and tangy goat cheese. YUM!

That’s all for meow!

For more Sweet Cats!, follow along at:

Bloglovin’
Twitter
Facebook
Pinterest
Instagram

One & Done Dinner- Salmon, Sprouts, & Sweet Potato

Hey Cats!

I hope everyone is having a good week! I’ve got a few projects coming up at work, so it has been a busy week, and it’s only Wednesday! When life gets busy, it can be really easy to eat whatever’s fast and doesn’t require a sink full of dishes. So basically Chick-Fil-A, pasta, or anything else that’s probably fried and severely lacking in nutritional value. However, I’ve found that eating crap when you’re busy makes you feel even worse and slows you down when you don’t have time to be slowed down. Lately, I’ve been experimenting to come up with healthy dinners that are more exciting than my usual chicken-quinoa-roasted brussels sprouts combo, and require less clean up. I crafted this little trio last week and it’s already made a repeat appearance! Pecan-crusted salmon, a baked sweet potato, and roasted Brussels sprouts (lol if you thought I could stray from this) with goat cheese- sounds pretty involved, right? False. Let me show you how it’s done.

image1 (1)

Here’s what you’ll need:

-1 small sweet potato

-1 portion of salmon (I either get the 4oz serving from the fish counter or get a large piece and cut it in 3rds and freeze the rest!)

-1 tablespoon of butter

-1 tablespoon chopped pecans

-1 tablespoon grated parmesan

-1 tsp dry ranch dressing mix

-1/2 cup brussels sprouts,  quartered

-olive oil

-honey

-goat cheese crumbles

-almond butter (optional but HIGHLY recommended. Highly)

Here’s what you do:

1.First, you’ll need to bake the sweet potato by itself for a bit. Wash your sweet potato and poke holes all over with a fork- just don’t stab yourself (I have done this. Raise your hand if you’re not surprised). Bake at 400 for 30-45 minutes, depending on the size of your tuber. You can just place it on the middle rack of your oven, no pan needed!

2. While your sweet potato is baking, do what you need to do. Live your life. Unload your dishwasher. Throw a load of laundry on. Do your workout for the day. Sit on the couch and watch trash tv. Neglect to write a blog post. It’s up to you. This is your time.

3. When your timer has about 15 minutes left, prepare the rest of your dinner for baking. Cover a baking sheet with foil whilst rejoicing that this is the only thing you will have to wash.

4. Prepare the salmon by following steps 1-4 of this recipe. Yes, I’ve made this before, but it was solo. This time it has friends. If you’re not feeling fancy, you can always simply season your salmon with salt, pepper, and dill!

5. Next, prepare your sprouts. Here’s my process: chop off the hard stem on the bottom, hopefully taking the outer leaves with it. Peel off a few layers of leaves until it looks clean. (always wash them first, by the way) Chop the little sprout in half, then in quarters. If the quarters are still large, I’ll chop them again! Toss them in olive oil, salt, and pepper- this can be done on the pan!

6. Then, assemble the pan. Place the salmon on one side, sprouts on the other, and the sweet potato in the middle. Fits perfectly!

IMG_1683

7. Increase the heat to 425, and bake everything for another 20 minutes, until the salmon is cooked thoroughly and the sprouts are crispy!

8. Next, dress it up! I drizzled honey and crumbled goat cheese on the brussels sprouts, thanks to Bites of Bri. Ugh, so good I nearly cried. Then, instead of cinnamon and sugar on my sweet potato, I put a dollop of almond butter on top after a recommendation from my coworker (thanks, Natalie!). Changed. My. Life. It’s so creamy and delicious. I was afraid it would be too sweet but it is excellent. You will die. And then come back to life to thank me profusely.

9. Enjoy your gourmet dinner and then enjoy only washing one pan!

Side note: when I told my mom about this, I kept going on about how “it only took one pan!”. Eventually she asked me, “Is that because you only have one pan?”. No, it’s because I’m lazy. But honestly, I’m not even surprised, because I also told her that day that I had made toast in my oven in a loaf pan. Because I’m resourceful. And I’m not married so people don’t think I need/want nice kitchen appliances such as a toaster. I digress.

Do you have any one-and-done dinners? Please share, I hate washing dishes!

That’s all for meow!
For more Sweet Cats!, follow along at:

Bloglovin’
Twitter
Facebook
Pinterest
Instagram

Recipe- Good Morning Green Smoothie

Disclaimer: This post may contain affiliate links. Making purchases/clicking may help support this blog.

Hey Cats!

Breakfast is the most important meal of the day. Mostly because if I don’t eat it, I become irrationally hungry at around 9 am. For the longest time, I thought that I could never have “just” a smoothie for breakfast. “I need to EAT something, not drink it through a straw!”, I exclaimed. Well, a few weeks ago my friend Ashley Snapchatted (Verbs of 2016) me her green smoothie and something came over me like a wave of healthiness: I had to try it. So I tweaked her recipe a bit and now it’s my breakfast every day! This is a great way to make sure you get at least some fruits & veggies in your diet each day, and it’s a healthy way to start your morning!

IMG_1502

Here’s what you’ll need:

-1/2 cup soymilk

-1 handful of spinach leaves

-1 whole banana, sliced

-1/4 cup pineapple (I buy the pre-cut chunks from the produce section and just throw a few in!)

-1/2 tablespoon of chia seeds

-1/2 tablespoon of almond butter

Here’s what you do:

  1. Load everything into your blender in the order listed. It’s best to have the more dense ingredients closest to the blade so you’re not left with big chunks! I use a single-serving blender similar to this one, so I start with the soymilk and work my way down!
  2. Blend it up until it’s smooth and enjoy!

This takes me about 3 minutes every morning, and it’s so delicious! At first I was just blending the milk, spinach, and fruit, but I was noticing that I would get really tired throughout the day, so I added the almond butter for protein! You can change this up any way you choose: my friend Ashley uses mango instead of banana, or you could add berries or use a protein powder. The possibilities are endless! Let me know what your favorite green smoothie recipe is!

That’s all for meow!

For more Sweet Cats!, follow along at:

Bloglovin’
Twitter
Facebook
Pinterest
Instagram

Recipe- Egg-in-a-Hole Avocado Toast

Hey Cats!

I’m getting a bit of a late start this week with the blog posts-sorry! I had every intention of posting on Monday, but I got home later than I had hoped on Sunday night, and it just didn’t happen. Also, HEB was closed for Easter, which honestly sent me into sheer panic. I had to go to Kroger and could not find brussels sprouts and nearly lost it. But I digress.

Today, I’m sharing one of my latest breakfast favorites with you. I got on an avocado toast kick a few weeks ago, and one Saturday morning when I had some extra time, I decided to kick it up a bit. Take it to the next level. Pretend I am the Pioneer Woman (that happens every time I cook, but whatever). I made an egg-in-a-hole, and smeared avocado on top. Yaaaas.

FullSizeRender (2)

Here’s what you need:

-2 slices of bread. You can definitely use plain sandwich bread, but I bought whole-grain seedy bread from the bakery section, because it’s extra delicious.

-2 eggs (or one per slice of bread if you’re making less or more!)

-1/2 avocado, mashed

-Sriracha to taste

Here’s what you’ll do:

1. First, heat a nonstick skillet over medium heat, and either melt a tablespoon of butter or spray with cooking spray.

2. While the butter is melting, prepare the bread by cutting out a hole in the center of the slice. You can brown the excess or just go ahead and eat it (that’s what I do).

3. Next, place the bread in the skillet. I like to put one side down and then flip it so each side is buttery!

4. Then, break an egg into the hole of each slice of bread. It will probably ooze out of the edges, but that’s okay!

5. Let the egg cook for a while, then flip to cook the other side! Warning-this is difficult and messy, but if I can do it, you definitely can too! Just use your largest spatula and both hands.

6. Cook until the whites are set, flipping again if necessary.

7. After the eggs are done, in a small bowl mash up half an avocado. I use about 1/2 of an avocado per two slices.

8. Smear a thick but even layer of avocado on each piece of egg toast. Be generous, avocado is the good fat! Apparently.

9. Drizzle with sriracha for a kick! Another option is crushed red pepper, but I love how the sriracha literally sets my lips on fire.

10. Enjoy!

I love the combination of the creamy egg yolk, crisp bread, and smooth avocado. So yum! Give this a try the next time you’re craving a healthy, savory breakfast, and if you do, let me know how you like it!

That’s all for meow!

For more Sweet Cats!, follow along at:

Bloglovin’
Twitter
Facebook
Pinterest
Instagram

Recipe-Broccoli Cheese Quinoa Cups

Hey Cats!

When it comes to planning ahead, sometimes I’m really on top of things, and sometimes I find myself winging it. Actually, that’s most of the time. One instance in which I have found myself without a plan and in a pickle is when it’s 8:34 and I’m pouring my coffee to-go thinking, “I should already be in the car, and also what am I having for lunch today?” Granted, there are a few fast food restaurants within walking distance of my office, so it’s not like I’ll starve or anything, but I like to bring my lunch as often as I can, because getting lunch every day can get pretty expensive, and I can only eat so much Chick Fil A before I start to feel like an actual chicken nugget. So more often than not, I’ll throw some quick items into my lunch box and hope for the best. This can include at least three of the following: a cheese stick, packaged crackers, almonds, fruit snacks, or yogurt. I realized that this was an issue when I opened my lunchbox one day to find yogurt, a cheese stick, and cheese sandwich crackers. Straight diary. Whoops.

I decided that the challenge was to make or find something healthy that I could throw into my lunchbox when I was already running late. I also wanted something that wasn’t too expensive and wouldn’t make my grocery list excessively long. Quinoa, my favorite superfood was on the forefront of my mind, since I had recently made pizza quinoa bites for lunch. But I was out of pepperoni and Parmesan. Then I found the broccoli, and this recipe was born!

FullSizeRender (1)

Here’s what you’ll need:

-2 cups of cooked quinoa (1 cup dry)

-2 eggs

-1/2 cup shredded cheddar cheese

-1/2 cup fresh broccoli, finely chopped.

Here’s what you’ll do:

First, cook your quinoa. You can make it just for this recipe, or this is a great way to use leftovers!

Next, mix in the eggs, cheese, and broccoli until fully incorporated. For the broccoli, make sure you chop it into very tiny pieces. I did not, and didn’t love the taste of biting into a broccoli tree. I also removed most of the larger stems.

After it’s all mixed together, scoop into a greased muffin tin. If you fill each one about 3/4 of the way full, you should be able to make a dozen!

Bake at 350 degrees for 15-20 minutes, or until set. The egg should be completely cooked but still a bit fluffy, with kind of a quiche-like texture.

Optional: top each bite with a sprinkle of cheese and place back in the oven for 5 more minutes, or until the cheese is melted.

Simple, right? I divided them into portions of 3, so I had lunch for 4 days! I placed each portion in a Ziploc bag and stuck them all in the freezer door. I zapped them for about 45-60 seconds at work for a yummy, healthy lunch! You can also bring marinara sauce to dip them in for a little more zest. This takes about 45 minutes on a Sunday afternoon, and you’ll have lunch for (nearly) the whole week!

That’s all for meow!

For more Sweet Cats!, follow along at:

Bloglovin’
Twitter
Facebook
Pinterest
Instagram


Recipe-Pizza Spaghetti Squash Boats

Hey Cats!

We’ve talked about how eating healthy was a big part of my life when I was in college, but unfortunately, I have fallen off the wagon since graduation. For some reason it has been extra hard to cook every night, so when I find healthy recipes that I love, I hang on to them!

I have a love-hate relationship with spaghetti squash. It usually sounds like a good idea at the grocery store, but then once I get home I realize that it’s a lot of trouble, and until now, I didn’t have a super delicious way to prepare it. A few weeks ago I was pushing my cart through Trader Joe’s and saw a spaghetti squash. “I haven’t made one of those in YEARS”, I said to myself, and tossed it in my basket without another thought. Then I got home and it was staring at me, asking me, “now what? Please not just garlic powder and cheese”. So I had to get creative. I scrolled through Pinterest for some inspiration, and came up with this pizza-inspired twice-baked squash.

IMG_0895

Here’s what you will need:

-1 spaghetti squash

-1 cup marinara sauce

-1/2 cup grated mozzarella cheese

-1 tbsp olive oil

-salt, pepper, and garlic & onion powder to taste

Here’s what you do:

  1. First, prepare your spaghetti squash. There are a few ways to do this, but you’ll want to cut it in half lengthwise and cook it in the oven for optimum boat shape. Be careful while cutting it, it’s a dangerous task, especially if you only have steak knives. Anyways, bake at 400 degrees for 30-45 minutes, or until it is soft to the touch.
  2. Once the squash is cooked, scrape the “noodles” of one half into a mixing bowl. You can prepare both, but this recipe is for those of us cooking for one! I wrapped the other half in foil and stuck it in the fridge for another day, and just followed the same recipe!
  3. Mix the olive oil, salt, pepper, garlic and onion powder into the squash.
  4. Then, mix in 1/2 cup of the marinara sauce and 1/4 cup of the cheese.
  5. Next, spoon the squash mixture back into the shell.
  6. Top with the remaining sauce and cheese, and broil until the cheese is brown and bubbly!
  7. Enjoy your boat!

This is a yummy, healthy dinner that’s pretty filling and will make you feel great about yourself. Unless you go overboard on the cheese, which is understandable. Plus, if you’re cooking for only yourself, you have dinner for two nights! Spaghetti squash might just be my friend after all.

After-Work Snack: Whole Grain & Hummus

Hey Cats!

After putting it off for an embarrassing amount of weekends, I cleaned my entire apartment last night. It smells super clean and now I don’t want to touch anything for like three weeks. Love that so much. What I don’t love is that I was trying to FINALLY find out who A is on PLL (I mean, I know who it is, because no one can keep a secret, but I need to know the whole story), and my TV just freaked out and froze with 15 minutes left in the episode, and I couldn’t finish it. I have been waiting over 5 years for this. I can’t even. But I digress.

The past few days when I’ve come home from work, I have been wanting something different for a snack. I found this SkinnyGirl lime popcorn that I really love, but a lot of the time I’m not hungry enough for a whole bag of popcorn. I also bought the most delicious hummus from Kroger the other day to spread on my wraps for lunch. I ran around the entire store like a crazy person looking for it, and while I was doing that I decided that it was the most poorly-organized grocery store I had ever set foot in, and vowed never to return. But I probably will, because that hummus is really good. Anyways, I wanted some hummus, but I didn’t have anything to dip in it. Until I remembered my whole grain tortillas that I bought to make wraps for lunch. I cut one into wedges, baked it, and boom! Instant whole grain chips and hummus!

image2

Also, how cutie is this little red ramekin? My mom got me a set of four for my birthday and I love them- they’re great for so many different things! Now obviously, this isn’t exactly a recipe because homemade tortilla chips are by no means a new concept. But if you’re looking for a healthy snack and don’t have a lot on hand, this is a great option! Just cut a tortilla into wedges or strips (wedges is easier!), place on a baking sheet and bake at 425 for 5-7 minutes, or until crispy! I always buy whole wheat tortillas because it seems like the healthiest option, and I actually really love them in chip form, too! They taste almost like a pita chip, but not as salty, and they have a lighter crisp rather than a crunch. I’m probably going to run out of both tortillas and hummus doing this, but it’s so delicious! Have a wonderful pre-Friday, everyone!

That’s all for meow!

For more Sweet Cats!, follow along at:

Bloglovin’
Twitter
Facebook
Pinterest
Instagram