Recipe: Sprinkle Cake

Hey Cats!

This past weekend, I had a family reunion with my dad’s side of the family. We have it every year, and I always love going! It’s great to see my family, plus there’s always really delicious food. I was talking to my dad a couple of days before and he asked me what I was going to bring. “Wait, what?” I’m still used to being a child and not having to bring food, but I guess since I’ve been a responsible adult for a full year, I’m capable of bringing some sort of dish to a function. So, I decided to make one of my favorite recipes that’s beyond easy but also delightful. And I made two, because I wanted to keep one for myself.

FullSizeRender (15)

Sprinkle Cake!! Y’all. This cake is probably my favorite. It’s simply a pound cake with sprinkles inside! Confession: I only make this to take somewhere when I know I will have plenty to bring home. Not a joke. I like to eat it for breakfast. It’s just SO GOOD. Also, people love it, because it’s fun! You know how people have “signature dishes” that they’re asked to bring to functions? I want this to be mine. “Kristen, bring that sprinkle cake, it’s so good!”. That is my dream.I clearly have too much time on my hands. So anyways, here’s how you make this:

I got this recipe from The Sweet {Tooth} Life, so I can’t really take credit, but I would love to share!

Here’s what you’ll need:

-1 cup (2 sticks) butter, softened

-1 cup of sugar

-4 eggs

-1 tsp vanilla extract

-1/2 tsp salt

-2 cups of flour

-1/2 cup rainbow sprinkles (I used Jimmies… I honestly hate that they’re called that so much but I couldn’t think of another way to explain them. Ugh Jimmies. Such a stupid name.)

Here’s what you’ll do:

1.First, cream together the butter and sugar in a large bowl.

2. Add eggs one at a time, beating thoroughly after each.

3. Mix in vanilla and salt until fully incorporated.

4. Add flour and stir until smooth!

5. Add the sprinkles and give it another stir

6. Transfer to a buttered & floured loaf pan

7. Bake at 350 degrees for one hour

8. Enjoy!

This is a great quick dessert to bring to an event, or for whenever you feel like something sweetie. Give it a try and let me know what you think!

That’s all for meow!

For more Sweet Cats!, follow along at:

Bloglovin’
Twitter
Facebook
Pinterest
Instagram

Recipe-Broccoli Cheese Quinoa Cups

Hey Cats!

When it comes to planning ahead, sometimes I’m really on top of things, and sometimes I find myself winging it. Actually, that’s most of the time. One instance in which I have found myself without a plan and in a pickle is when it’s 8:34 and I’m pouring my coffee to-go thinking, “I should already be in the car, and also what am I having for lunch today?” Granted, there are a few fast food restaurants within walking distance of my office, so it’s not like I’ll starve or anything, but I like to bring my lunch as often as I can, because getting lunch every day can get pretty expensive, and I can only eat so much Chick Fil A before I start to feel like an actual chicken nugget. So more often than not, I’ll throw some quick items into my lunch box and hope for the best. This can include at least three of the following: a cheese stick, packaged crackers, almonds, fruit snacks, or yogurt. I realized that this was an issue when I opened my lunchbox one day to find yogurt, a cheese stick, and cheese sandwich crackers. Straight diary. Whoops.

I decided that the challenge was to make or find something healthy that I could throw into my lunchbox when I was already running late. I also wanted something that wasn’t too expensive and wouldn’t make my grocery list excessively long. Quinoa, my favorite superfood was on the forefront of my mind, since I had recently made pizza quinoa bites for lunch. But I was out of pepperoni and Parmesan. Then I found the broccoli, and this recipe was born!

FullSizeRender (1)

Here’s what you’ll need:

-2 cups of cooked quinoa (1 cup dry)

-2 eggs

-1/2 cup shredded cheddar cheese

-1/2 cup fresh broccoli, finely chopped.

Here’s what you’ll do:

First, cook your quinoa. You can make it just for this recipe, or this is a great way to use leftovers!

Next, mix in the eggs, cheese, and broccoli until fully incorporated. For the broccoli, make sure you chop it into very tiny pieces. I did not, and didn’t love the taste of biting into a broccoli tree. I also removed most of the larger stems.

After it’s all mixed together, scoop into a greased muffin tin. If you fill each one about 3/4 of the way full, you should be able to make a dozen!

Bake at 350 degrees for 15-20 minutes, or until set. The egg should be completely cooked but still a bit fluffy, with kind of a quiche-like texture.

Optional: top each bite with a sprinkle of cheese and place back in the oven for 5 more minutes, or until the cheese is melted.

Simple, right? I divided them into portions of 3, so I had lunch for 4 days! I placed each portion in a Ziploc bag and stuck them all in the freezer door. I zapped them for about 45-60 seconds at work for a yummy, healthy lunch! You can also bring marinara sauce to dip them in for a little more zest. This takes about 45 minutes on a Sunday afternoon, and you’ll have lunch for (nearly) the whole week!

That’s all for meow!

For more Sweet Cats!, follow along at:

Bloglovin’
Twitter
Facebook
Pinterest
Instagram


Last-Minute Costumes: Pineapple and Strawberry

Hey Cats!

I have always loved dressing up, whether its for Halloween, spirit days, date parties, or you know, Wednesday. However, I always wait until the last minute to get my costume together, and there have been a couple of times where I just ended up wearing cat ears. As per usual, I waited until the week of Halloween to decide on my costume, but this time I actually made something! My bestie and I decided to be a pineapple and a strawberry. I found the idea while scrolling through Instagram, and it was so cute and looked so simple to make.

IMG_1019

Also: my face. I usually cut my face out when I take mirror selfies, but obviously I had to get the bow in. It makes me feel awkward to take selfies of my actual face, so this is what I have to offer you. Bye.

IMG_1020

Here’s what you’ll need:

Pineapple:

-1 oversized yellow t-shirt

-black puffy paint

-green bow

Strawberry:

-1 oversized red t-shirt

-white puffy paint

-green bow

Here’s what you do:

First, be sure to put a piece of newspaper inside your t-shirt. This will keep the paint from bleeding through and causing the shirt to stick together!

For the pineapple, simply draw rows of inverted V’s across the entire shirt and the sleeves, like the picture!

For the strawberry, simply draw teardrops haphazardly. You can fill them in if you’d like, but it looks just as good if you don’t!

Also, I was going to make a headpiece of some sort out of green construction paper, but then I found these green spirit bows at HobLob, and as every retired cheerleader knows, DO NOT EVER pass up the opportunity to wear a spirit bow. You will regret it.

These shirts took me maybe 5 minutes each to paint, and cost less than $5 for the entire costume. Pair the tees with black leggings and riding boots and you’re ready to go! This is a great idea for Halloween, date parties, big-little reveal, or any other occasion where you need a cheap but creative costume.

I hope everyone has a fun and safe Halloween!

That’s all for meow!

For more Sweet Cats!, follow along at:

Bloglovin’
Twitter
Facebook
Pinterest
Instagram

Recipe-Pizza Spaghetti Squash Boats

Hey Cats!

We’ve talked about how eating healthy was a big part of my life when I was in college, but unfortunately, I have fallen off the wagon since graduation. For some reason it has been extra hard to cook every night, so when I find healthy recipes that I love, I hang on to them!

I have a love-hate relationship with spaghetti squash. It usually sounds like a good idea at the grocery store, but then once I get home I realize that it’s a lot of trouble, and until now, I didn’t have a super delicious way to prepare it. A few weeks ago I was pushing my cart through Trader Joe’s and saw a spaghetti squash. “I haven’t made one of those in YEARS”, I said to myself, and tossed it in my basket without another thought. Then I got home and it was staring at me, asking me, “now what? Please not just garlic powder and cheese”. So I had to get creative. I scrolled through Pinterest for some inspiration, and came up with this pizza-inspired twice-baked squash.

IMG_0895

Here’s what you will need:

-1 spaghetti squash

-1 cup marinara sauce

-1/2 cup grated mozzarella cheese

-1 tbsp olive oil

-salt, pepper, and garlic & onion powder to taste

Here’s what you do:

  1. First, prepare your spaghetti squash. There are a few ways to do this, but you’ll want to cut it in half lengthwise and cook it in the oven for optimum boat shape. Be careful while cutting it, it’s a dangerous task, especially if you only have steak knives. Anyways, bake at 400 degrees for 30-45 minutes, or until it is soft to the touch.
  2. Once the squash is cooked, scrape the “noodles” of one half into a mixing bowl. You can prepare both, but this recipe is for those of us cooking for one! I wrapped the other half in foil and stuck it in the fridge for another day, and just followed the same recipe!
  3. Mix the olive oil, salt, pepper, garlic and onion powder into the squash.
  4. Then, mix in 1/2 cup of the marinara sauce and 1/4 cup of the cheese.
  5. Next, spoon the squash mixture back into the shell.
  6. Top with the remaining sauce and cheese, and broil until the cheese is brown and bubbly!
  7. Enjoy your boat!

This is a yummy, healthy dinner that’s pretty filling and will make you feel great about yourself. Unless you go overboard on the cheese, which is understandable. Plus, if you’re cooking for only yourself, you have dinner for two nights! Spaghetti squash might just be my friend after all.

Recipe- Corn & Black Bean Summer Salad

Hey Cats!

Happy Tuesday! I skipped Monday’s Musing’s yesterday, as you may have noticed. I wrote one, but then I decided that I didn’t like it, so I didn’t post it. But I’ve been super excited about sharing this recipe, so here it is!

I signed up to make a side dish for my 4th of July party before I really thought about what I would make. So naturally, I called my mom and asked what she thought people would like, because no one wants to bring that thing that no one else eats. She suggested this yummy corn and black bean salad that she had made for my graduation party a few weeks ago, and I was on board!

FullSizeRender


Here’s what you’ll need:

-1 can black beans

-1 cup frozen corn

-1/2 cup fresh cilantro, chopped

-1 chopped green bell pepper

-1/2 purple onion, diced

-1/2 cup grape tomatoes, halved or quartered

-2 tbsp olive oil

-juice of 2 limes

-salt

-garlic powder

-1 avocado, diced

Here’s what you’ll do:

1. Rinse and drain the beans, and microwave the corn for about 30 seconds, until defrosted but not cooked.

2. Next, in a large bowl, toss together all the ingredients except the olive oil, lime juice, salt, garlic powder and avocado.

3. Then, mix together the olive oil, lime juice, salt, and garlic powder in a small bowl.

4. Drizzle the dressing over the veggies, and toss to coat.

5. Leave in the fridge for at least an hour.

6. Right before serving, add the avocado, another squeeze of lime juice and toss again.

7. Enjoy!

How easy is that? You can serve this with chips, or on its own as a salad! I love that it’s so colorful- it makes me want to eat it all. Also, I had some left over, so I spread some hummus on a whole grain tortilla, filled it with the salad, and rolled it up for a great lunch wrap! This is a great healthy dish to take to a party, or just to make for yourself!

That’s all for meow!

For more Sweet Cats!, follow along at:

Bloglovin’
Twitter
Facebook
Pinterest
Instagram

WorkIt Wednesday- 3 Step Breakfast Bowls

Hey Cats!

Happy Wednesday! You know what that means- we’ve made it halfway through the week! It also means WorkIt Wednesday is back. I’m going to be honest, I have not been working it lately. I’ve just been super tired and not feeling like going to the gym, and I haven’t been eating very well. But, it’s time to get back on track! I’ve fallen off the wagon quite a few times in my day, and I’ve found that the easiest way to get back on is to start at the beginning (breakfast) and work up from there. I usually just eat Greek yogurt for breakfast, but sometimes that gets boring, and I get REALLY hungry/hangry at around 10 am, leading me to break into my lunch at the first acceptable moment (11 am), which means I’m starving again by 5, and come home and eat everything I see. Which is obviously incongruent to my goals. After seeing these on Pinterest, I decided to make my own version of a protein-packed breakfast bowl. I’ve made a few different varieties, and have devised a simple 3-step formula for the perfect bowl.

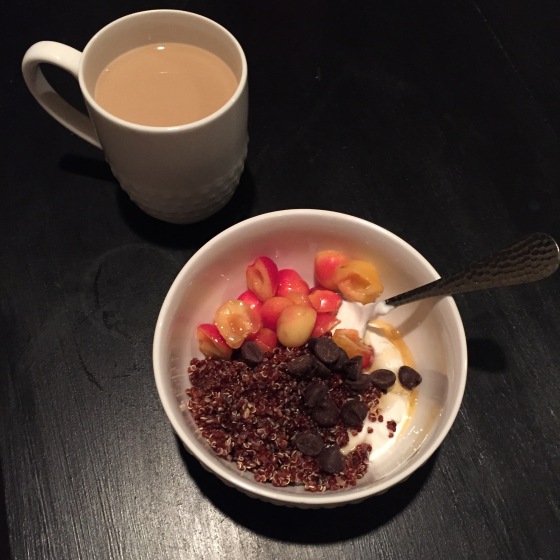
IMG_0585

1. Base-start with a single-serving cup of your favorite flavor of yogurt. I usually use coconut Chobani, but they were out, so I settled for plain. Sometimes I will mix a tablespoon of peanut butter in with the yogurt to add a little extra protein and flavor!

2. Make it sweet- For me, this is a drizzle of honey, but you could use agave nectar, stevia, or just leave it plain if you’re using a flavored yogurt.

3. Add the extras-I usually add 1/4 cup of quinoa and some type of fruit, but you could add nuts, granola, or even chocolate chips to make it interesting!

How easy is that? 1,2,3, breakfast! Here are a few of my favorite combos:

-Coconut Chobani mixed with peanut butter, quinoa, a drizzle of honey, and a handful of raspberries

-Plain Greek yogurt, quinoa, a drizzle of honey, a few halved cherries, and chocolate chips (pictured above)

-Peach yogurt, quinoa, a drizzle of honey, and a sprinkling of toasted almonds and granola

If you come up with a new combo, let me know- I would love to try it! This is an easy way to have a healthy breakfast to help you power through your day, and it’s completely flexible to accommodate your tastes.

That’s all for meow!

For more Sweet Cats!, follow along at:

Bloglovin’
Twitter
Facebook
Pinterest
Instagram

DIY- Monogrammed Mortarboard

Hey Cats!

It’s Wednesday! I hope y’all are having a wonderful week, and if not, Friday is in 48 hours, so keep thinking about that. Houston has decided to finally be sunny, which I have been loving after all of these scary floods. Luckily, most of the roads where I live weren’t affected and I was still able to get to work (and Chipotle, thank God), but I know there was a lot of flooding and damage near downtown Houston. But at last the sun is shining, it’s actually worth my time to fix my hair, and it’s finally starting to feel like summer!

As you all know, I recently graduated from college. One thing I had been looking forward to about graduation (for a few years, actually) was decorating the mortarboard. I also knew for quite some time that I wanted to put my monogram on it, because as you all also know, if I can monogram it- I will. On your mortarboard, it’s classic, personal, and even if there are 50 other girls with monogrammed caps, your family can (maybe) still tell which robed figure you are. In the words of my friend Ashley, “either monogram it or leave it blank”. Couldn’t have said it better myself.

However, I personally don’t have the best penmanship (I like to describe my handwriting as comparable to that of an 8th grade boy), so I knew that I wasn’t going to be able to do this myself. Ashley had hers embroidered, which I really, REALLY loved and planned to do for probably a year. But, guess who forgot to order her cap and gown until Spring Break (Sometimes I’m not really sure how I made it through college), and wasn’t able to pick it up until three days before graduation? So embroidery was obviously out of the question, and I was forced to get creative.

While scrolling through my Instagram feed, I caught a glimpse of a car decal on Marley Lilly’s account, and I had an epiphany. Buy the decal and stick it on my hat. Minimal effort, maximum effect. However, I was a little concerned as to whether or not the decal would stick to the fabric on my mortarboard. After all, you only get one hat, and I didn’t want to mess it up. So I emailed support at Marley Lilly, asking whether or not they had ever received feedback on using a car decal on a graduation cap. The girl that responded was very nice, and she even gave me a few tips!

IMG_0393

I chose the 5 Inch Decal in pink glitter, because go big or go home, obviously. I chose to place it in the back corner, because the button was in the way, and luckily, it fit right in the center of the “M”. It was pretty easy to apply, but I did accidentally rip it, as you can see in the left corner of the “L”. But, it wasn’t too noticeable, and I was still really happy with it! It matched my dress, and my family said they could definitely find me in the crowd… but that could have been because I was struggling to keep the stupid thing on my head as I walked in Note: if you’re graduating soon, please bring bobby pins, no matter how big you think your head is. Because though they claim to be one size fits all, they sure are not. I digress. But seriously, if you’re looking for a quick and inexpensive way to add a personalized touch to your big day, a decal is the way to go. Marley Lilly has a variety of sizes, fonts, and colors, so you can coordinate to your dress, show some school spirit one last time, or just pick your favorite color! Whatever you decide, just remember that if you don’t monogram it, just leave it blank.

That’s all for meow!

For more Sweet Cats!, follow along at:
Bloglovin’
Twitter
Facebook
Pinterest
Instagram

Recipe-Cookie Butter Mug Cake

Hey Cats!

Yay Thursday, Yay weekend, Yay it’s almost my birthday! I’m headed to work early this morning, and then to East Texas around 2, and I can’t wait to see my family!

Also, last night I had the best time with a group of my friends. We all met in a Group Communication class our sophomore year, and it was definitely meant to be. We’re all different, yet similar at the same time, and it’s been wonderful getting to know them both in and outside of classes. It’s great to have friends in the same program, especially since a lot of people think that Communication majors don’t take their lives seriously (hi, we do.)…we share the same struggles with advisors, finding resume-boosting internships, and figuring out exactly what to do with our lives. They also all love Jesus, so it’s awesome to have friends to talk about the above-listed things from the same perspective. We got together last night and had a nice little chat, as we do every so often since we don’t have classes together much anymore, and it was such a treat!

You’re probably wondering where this cookie butter recipe is by now. But if you know cookie butter, you know it’s worth waiting for. College Station nor Tyler has a Trader Joe’s, so the last time I went to Houston to visit my bestie Ashley I begged to go, for the sole purpose of purchasing a jar of gold for myself. I typically eat it by the spoonful (just one at a time, obviously), but the other night I decided to get creative. I love mug cakes, and I love cookie butter, so I decided to combine the two. I loosely followed this recipe, but omitted the White Chocolate Wonderful because 1. I don’t even know what that is and 2. I obviously was fresh out.

photo (86)


Please excuse the nibble taken out of the top…I had to see if it was done!

Here’s what you’ll need:

-4 tablespoons flour

-4 tablespoons sugar

-1/4 tsp baking soda

-1 egg

-2 tbsp Cookie Butter (I may have used a little less…this stuff is sacred)

-5 tbsp milk

Here’s what you do:

– Combine all the ingredients together in a bowl, using a whisk or a fork to make sure the cookie butter is fully incorporated. This may take a few minutes, and it will be pretty thin batter.

-Pour into a large mug- I used one of my faves, isn’t it beautiful?

-Microwave for about 2 minutes, or until firm.

Enjoy! You could also throw in some chocolate chips if you like! I ate this and watched the first RHONY reunion, which was anti-climactic. I just want to get to the part where we talk about Aviva throwing her leg. #bye.

That’s all for meow!

For more Sweet Cats!, follow along at:

Bloglovin’
Twitter
Facebook
Pinterest
Instagram

Recipe- Caprese Quinoa

Hey Cats!

Happy Wednesday! Only one more day, then a long weekend- I can’t wait!

Last night for dinner, I made a new quinoa recipe that my sister shared with me, and it was SO good! She told me that she takes it in her lunch, which I’m definitely doing today. It uses red quinoa, which has a more chewy texture that I like better than regular quinoa. Here’s what you’ll need:

photo (82)


– Red quinoa (I used 1/2 cup since I was making it for just myself as a side dish)

-Cherry tomatoes

-Fresh basil

-One mozzarella cheese stick

-Balsamic vinegar

Here’s what you do:

1. First, prepare the quinoa according to the package directions. As I said, I used 1/2 cup dry quinoa and 1 cup water.

2. While the quinoa is cooking, chop the rest of the ingredients. I sliced the tomatoes in half, finely chopped the basil, and sliced the cheese stick into round pieces.

3. Once the quinoa is finished, transfer it to a large bowl and add the tomatoes, basil, and cheese. Stir until incorporated. The cheese will start to melt, and while it doesn’t need to be completely melted, a little is okay!

4. Add about one tablespoon of balsamic vinegar and stir- but be careful that you don’t add too much- it’s strong!

5. Enjoy!

image (77)

How easy is that? I know that this isn’t the most exact recipe, but I didn’t really measure while I was making it…oops! Just add the ingredients to your taste! Also isn’t the garnish lovely? I usually forget about taking food pictures for my blog until its too late, but not this time!

That’s all for meow!

For more Sweet Cats!, follow along at:

Bloglovin’
Twitter
Facebook
Pinterest
Instagram

Roasted.

Hey Cats!

Happy Weekend! I’m off of work today, it’s payday (I think), and I get to see my sea-star tomorrow- it’s a great day.

I’ve never been very big on vegetables. As a child, I was forced to stay at the dinner table long after the rest of my family to finish an appropriate amount of peas or green beans- quite the dramatic scene I can assure you. When I went to college and started cooking for myself, I would microwave a small bowl of frozen green peas or frozen corn with every meal, so I could tell my mom that I was eating vegetables. However, I’ve recently discovered a new way to prepare vegetables that’s quite delicious- roasting them!

I’ve done this with brussels sprouts (my personal favorite), asparagus, and corn. Here’s my recipe for each:

Brussels Sprouts:

1. Halve or quarter brussels sprouts, depending on the size, and place on a baking sheet.

2. Drizzle with 1 tbsp olive oil, sprinkle with sea salt and black pepper. Stir to coat.

3. Roast in a 400 degree oven for 15 minutes, turning every 5 minutes.


Asparagus:

1. Wash asparagus and trim off the ends. Line the stalks up on a baking sheet.

2. Drizzle with 1 tbsp olive oil, sprinkle with sea salt and black pepper. Toss to coat.

3. Roast in a 400 degree oven for 15-20 minutes, turning halfway through.


Corn:

1. Spread frozen corn evenly on a baking sheet.

2. Drizzle with 1 tbsp olive oil, sprinkle with sea salt and black pepper. Stir to coat.

3. Broil at 500 degrees for 5-7 minutes, stirring occasionally. Keep an eye on this- I set the smoke alarm off in my house the first time I made it!


I love roasting vegetables because it’s a delicious flavor and it’s SO easy. I’ll usually stick both the veggies and whatever chicken I’m also cooking in the oven at the same time, and it’s a real time-saver. Lately, I’ve been throwing a handful of cherry tomatoes on the pan as well and letting the skin break and roast- so good. If you’re looking for a quick way to prepare your vegetables, or if you’re not the biggest herbivore like myself, you should definitely try roasted veggies. Your mother will be so pleased that you’ve finally learned to eat your greens- at least mine is!

That’s all for meow!

For more Sweet Cats!, follow along at:

Bloglovin’
Twitter
Facebook
Pinterest